Showing posts with label diy. Show all posts

Monday, July 2, 2012

{diy: guestroom collage & revolving guest frame}


happy monday!

The weekend is over and now it’s back to the grind. This weekend was a fun one! Our wonderful friend Giselle was in town for her first visit to Atlanta and of course we showed her a grand time. This was also an especially hot weekend! It was really sad at night when we were out dancing and would go from the sweaty dance floor to the outdoor deck---and there was no change in temperature! Ack! I hope these super hot summer nights are few and far between.

Today’s post is about two diy projects I worked on last week and finished last night (at 4AM!---I’m kind of a night owl). I’m so happy with the end results; they’re beautiful additions to our home.

First I’ll share the guestroom collage. In our guestroom there is a wall next to the bed that was bare for months. I would always stare at it and think of several different ideas for it. I had tons of frames and paintings I could put up but nothing really seemed to inspire me. Last week I decided it was time to make a decision already and just play around with what I had. I also searched around the net for some inspirations which helped quite a bit.

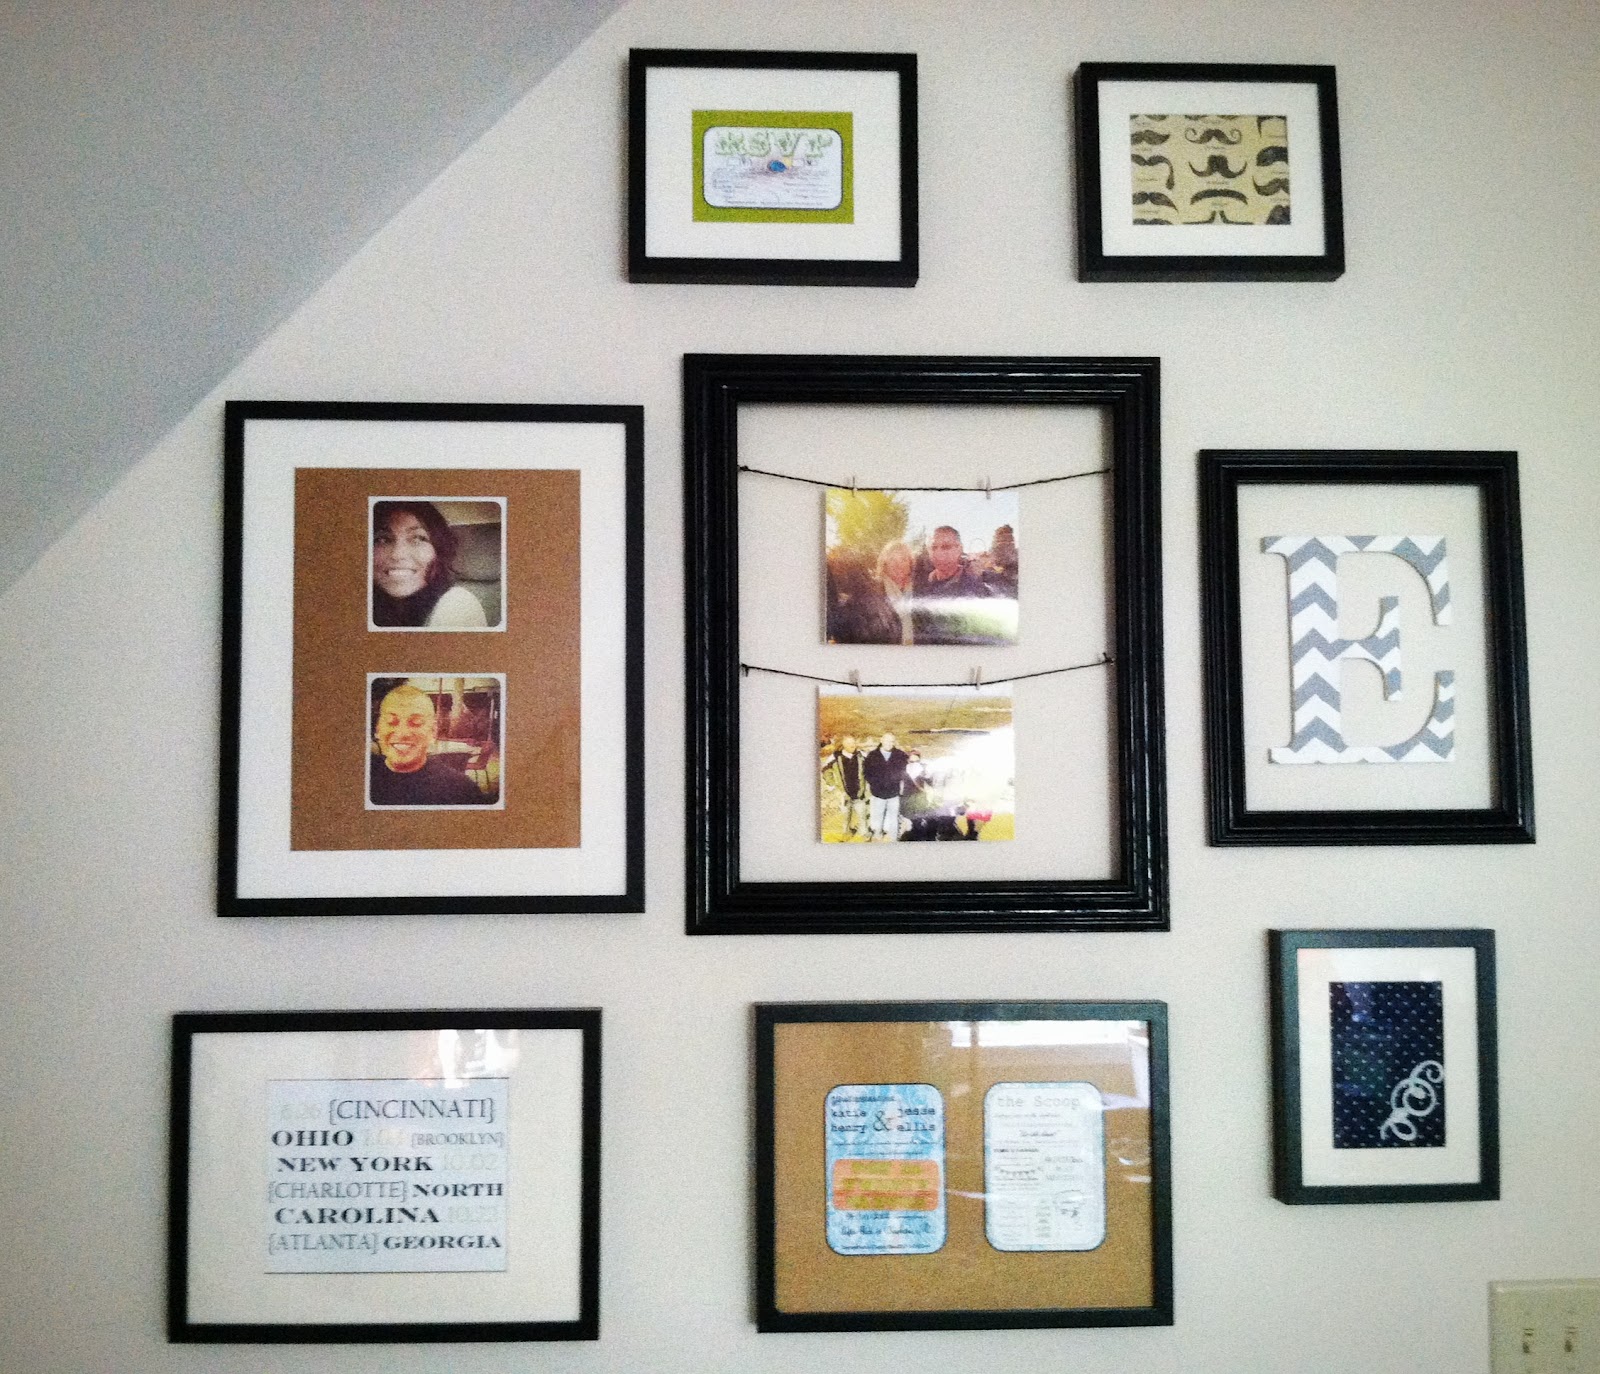
I decided to create a collage with matching color frames and a mix of diy prints and photos. I also came up with a cool idea for the collage to personalize the room for our guests---more on that later.

First, I laid out all my frames on the floor and moved them around until I found a set-up I really liked. I also had to spray paint two of the frames to match all of the other black frames.


Next, I laid out my prints and photos on top of the frames to get an idea of what the collage would look like. I wanted a good mix to make it more interesting.

This included:

instagram headshots of the hubs and I
a wooden “E” for Ellis with painted chevron
 subway art of some important places & dates
our wedding invite and rsvp card
 a piece of fabric with a little 3D detail
interesting printed stock paper
photos of some special people

My collage had a blend of matted and non-matted photos. I also wanted to include snippets of our guestroom colors: green, blue, grey, and white. I can never pick just one or two colors...haha.


After I was done moving prints and photos around I was ready to hang my collage up. Now, I hang frames by eyeballing where I want everything to be. It usually works out and I make very few errors. However, I found a great tutorial over at Young House Love for those of you who want to make extra sure that your collage comes out perfect.


It came out pretty nicely, don’t you think? I’m super happy with it. Of course some things will be rotated out overtime.

And now for the coolest part of the whole collage; the revolving guest frame.


I’m all about making memorable experiences, especially for any visitors we get our way. One idea I thought of was to display photos of our guests in the guestroom so they can feel special when they come over. However, we have tons of friends and family, but not enough frames. At first I thought of rotating out photos of our guests in the frames, however, that would have been time consuming and I don’t think our IKEA frames could’ve handled it (the tabs closing in the photos are kind of weak). But then I remembered the idea we used for displaying childhood photos at our wedding---clipping photos to string in an empty frame. It was perfect and fit in very nicely in the collage. Basically, I took a large empty frame, added eye screws to the sides, and strung twine from one side to the other. I used teeny clothesline clips to attach the photos to the twine.

Whenever guests come over, we’ll clip in photos of them and print out duplicates as a little souvenir. It’s just a small detail to make our guests feel extra special when they stay with us. If you look closely you can get a sneak peek of who’s coming to visit nextJ

And that’s all. What do you do to make your guests feel welcome? I always love hearing new ideas.


So long for now,

The Mrs.

Tuesday, June 26, 2012

{collages and chevron on my mind}

Hello! Hello!

It’s the beginning of a new week. Stay positive, the weekend is right around the corner, and if you can’t wait, there is always happy hour! This week is sure to be a busy one. I have a few crazy projects in store and we’re preparing for a special house guest this weekend. The hub’s birthday is also this week which is super exciting. We’re actually celebrating two weekends in a row---he’s sure to feel special.

 There are two projects that have been sitting on the back burner for months and months. They’re not terribly difficult; I just haven’t had the time to tackle them. I want to put up a picture/frame collage in our guest room and finish a chevron canvas painting for the kitchen. I’ve been looking all over for inspiration.

Here are a few that stood out to me:


I do love projects. I’ll be sure to post updates as soon as they’re complete!
 
So long for now,
 
The Mrs.

Tuesday, May 22, 2012

{sweet surprises: cinnamon bun orange}

Hello friends!

Today I’m going to share something fun (and sweet) that we successfully attempted during our Easter camp trip. I heard about this trick sometime ago and had always wanted to try it. It’s called the “Cinnamon Bun Orange.” Basically you cook a cinnamon bun inside a hollowed out orange over a campfire. The little bun is cooked perfectly and ends up with some citrus hints. Below is a short tutorial on how to do it yourself!


Cinnamon Bun Orange How To:

1. Take an orange, cut it in half, and hollow out both sides. A spoon does the trick, but a citrus juicer makes it even easier.


2. Place a pre-made raw cinnamon bun inside one half of your hollowed out orange. I’ve never tried this with homemade cinnamon buns, (just the store-bought kind), so I’m assuming the cooking time will vary a bit.


3. Place the other half of the hollowed out orange on top of the one with your cinnamon bun and wrap the whole orange completely with foil.


4. Carefully place the foil covered orange into a fire pit. Do not put it directly in the fire, just near enough to the base of the flames to get warm. Let cook for about 20 minutes.


5. After 20 minutes, remove the orange from the fire and carefully unwrap it.


6. Remove the top half of the orange and voila! A perfectly cooked cinnamon bun!

And that’s how you do it! I was very surprised by how great this turned out. It was super moist and cooked all the way through. We only made one cinnamon bun like this and cooked the rest in an oven, but I think next time we may have to make them all this way (the ones in the oven overcooked and burned some). Give it a try on your next camp trip!

After awhile crocodiles!
Mrs. E

Wednesday, May 2, 2012

{diy: peacock guestbook}


For our wedding, we tried to incorporate as many unique and original details as possible. One of those details being our guestbook. I woke up from a dream one night and immediately wrote down this idea---a peacock guestbook. I like peacocks a lot; they’re so beautiful and colorful. I thought, wouldn’t it be cool if we could have our guests sign feathers and create one of those gorgeous birds. I searched for several ideas but couldn’t find anything I liked; then this idea struck my bride brain. It worked out well---even though not everyone quite understood how to sign their feather (oh well). The end result is beautiful and now we have a lovely piece of artwork for our home. We have several unsigned feathers left over as well that future guests can sign. Below is a little tutorial on how to create one of these for your own event/home. If you have any questions, feel free to ask!  


Peacock Guestbook How To:
 
1. Get a large canvas (as large as you want you peacock to be) and paint the background whatever color you want, and your peacock’s body in the foreground.

2. Lay a little guestbook banner across the top, for some flair.

3. Cut out large curved raindrops from cardstock and stamp a peacock feather on top in whatever colors you’d like your feathers to be.

4. Lay your feathers on top of each other, creating a pattern. (We actually laid out the loose feathers at our wedding for guests to sign during the reception; you could do it either way)

5. Look over the pattern you’ve created, making adjustments whereever necessary.

6. Once you’re happy with your pattern, take a glue glue and glue your feathers down to the canvas. Don’t add too much glue, just little dabs.

And you’re done! Hang it up somewhere lovely. Such a handsome peacock needs a good place where he can show off feathers.


You can even frame some instructions for you guests. It is a very unique guestbook afterall.


{isn’t he just gorgeous above our mantle?}


Wednesday, February 15, 2012

{diy: valentines for your valentine}


Hello!!!

How was your Valentine’s Day? I had a pretty lovely day; I ran some errands, enjoyed a very nice dinner with friends (my valentine is away), and made some cute little valentines for the special people in my life. The valentines were pretty easy to make and turned out very adorable. I think their receivers will be very pleased when they arrive. It may be a little late for these, unless you’re a procrastinator like me, but either way it’s a good project to save on that pinterest board. I made four kinds and used Kraft paper, twine, washi tape, and a sharpie---perfect for the budget conscious crafter.


{so easy, so fun}

Below you’ll find a tutorial for valentines with twine, lovebirds, and bunting.

{first you…}

1. Gather some basic supplies and embellishments. Not seen here—my trusty glue gun and box of colorful papers.
2. Grab a piece of 8x10 paper and fold it in half width-wise. I used brown Kraft paper.
3. Cut your paper along the fold so you have two smaller sheets.
4. Fold your pieces in half width-wise to create two blank card templates. Now you can begin decorating!


{then you…}

5. & 6. Cut out a few shapes or creatures for your valentines. You can use stencils or freehand them. I freehanded my little birds and bunting triangles.
7. Assemble your cut-outs. I added tail feathers to my birds later because they looked like tiny blue t-rexes…haha.
8. I wanted my little birds to sit on a piece of twine with a little heart in-between, so I hot glued it all together. Do this step before you add them to your card.


{to finish you…}

9.  Use an exacto knife to cut a little “x” in your blank card. You will string your twine through here.
10.   Before you string your birds or bunting you should decorate your card, inside and out; it’ll be easier now than later.
11.   Here’s an example of the twine strung through. You want to glue your bunting or birds on the twine before you string the twine through the card though.
12.    Tie a little knot at each end of the twine to keep it in place.

And voila!

{tooling with twine}


The washi tape valentines were the easiest. If you’ve never used washi tape, it’s simply decorative tape. It comes in all kinds of designs and can be found at your craft store or online. It’s a simple detail you can add to almost any project to give it a little pizzazz.


{peel & stick}

13. Add it to the outside edge of your card.
14. Or how about the front to make a simple but cute banner?


{washi tape fun}

It was so much fun to make these and I feel they are a lot more special because they were made by hand.

I hope you enjoy this project!

Love,

Mrs. E.

Tuesday, December 27, 2011

{nifty housewife: diy kitchen makeover}


{aren’t they cute? they were a wedding present from my wonderful cousin Sheren}


In the spirit of the New Year I decided to makeover our little kitchen. This project has been weighing on my mind for a long time, (I would even go to bed every night thinking about it, wishing I had started it already), so I finally decided to put on my paint clothes and jump right in.

When we moved in, the kitchen was my least favorite part of the house which didn’t work for me because that’s where I like to spend most of my time. It had this old granny wallpaper (sorry grandma) and creamy yellow cabinets. It is tiny with minimal storage—which we have been able to work with--and because of the décor scheme, it felt so much smaller of a space than it really was. The house was built in the early 90’s and the kitchen most likely had not been updated since then; it was in desperate need of a facelift.

For the new color scheme I decided to go with light gray walls and white cabinets and trim; I figured this would really brighten up and open the room. I also decided to paint over the wallpaper, which can be tricky and is not always advisable in every situation. If it is at all possible to remove your paper do that, but in some cases it’s impossible without damaging your walls. I had to do some research to make sure that I did this correctly and I suggest you do the same. Painting the cabinets was also a task but again, after researching tips I felt more confident about my ability to do this successfully. The whole project, walls and cabinets took me four days total to complete. Below are some tips for painting over your wallpaper, a tutorial for painting your cabinets, and of course, before and after pictures of our kitchen!


Tips for painting over wallpaper:
- Research! There are lots of great sites out there with tips and tutorials
- Check the quality of your wallpaper to see if you’re able to paint over it
— If it is really dirty wipe it down with warm soapy water before you begin
- If it’s peeling in spots, re-glue it down
- Fill in the seams so they don’t show when you paint over it
- Prime the walls with an oil-based primer---you don’t have to use oil-based paint for your main color


Painting your kitchen cabinets:

Step 1: Remove the drawers, cabinet doors, and all hardware from the doors. You might be tempted to tape over the hardware, however some of it can be very expensive to replace if damaged. If you want to speed up the process, use an electric screwdriver (they are awesome!).

Step 2: Wipe down the cabinet frames and doors with warm soapy water. Then tape-off the cabinet edges so you don’t get paint on your walls.

Step 3: Lightly sand your surfaces to help the paint stick better.

Step 4: Depending on your current cabinet color, you may or may not need to prime your cabinets. I didn’t, but it took me three coats of the white paint to cover the old color.

Step 5: Paint your cabinet frames. Paint one coat, let dry for about an hour, and then paint the next coat. After each coat check your work in good light to see if it needs another coat.

Step 6: After you’ve painted the last coat on your cabinet frames let it dry overnight, then carefully re-insert the drawers (make sure you’ve removed the knobs). Clean and sand the fronts, then paint them using the same method you used to paint the frames. Keep the drawers pulled out while you paint and as they dry.

Step 7: Lay your cabinet doors (front side down) in an area where they can stay laid out for a few days while they dry. Make sure all the hardware is taken off and that you keep it all together in one spot (so you don’t lose any of it). Also make sure you notice how it is put together (take a picture even) so you know how to put it all back later.

Step 8: Paint the first coat on your doors, wait an hour, then paint the next coat, repeat if necessary. I suggest painting the backsides first. If you flip them too early and they get a little smudged, they won’t really be seen until you open your cabinets.

Step 9: Let the backsides dry overnight, then check them the next day to see how dry they are. If they are still a little sticky to the touch, let them dry longer, if they are nice and dry carefully flip them and paint the fronts of your cabinet doors using the same method in Step 8.

Step 10: Let your doors, drawers, and cabinet frames dry for a few days. This is important because if you attach all the doors back to the frames while they are still tacky, your hardware will get stuck to the paint (making them hard to remove the next time you want to paint) and you will end up scratching off the new paint in several places requiring you to do quite a bit of touch-up.

Step 11: After about 3 – 5 days of drying time, re-attach all of the hardware and doors back to their frames.

Easy peasy…kind of.

Now, for the part you’ve all been waiting for…

{kitchen before}


{during the process}


Now for the finished product, drumroll please...


{kitchen after}


Yay! I love it and am so proud of my handiwork! It’s just new paint, but man doesn’t it completely change the overall look and feel?

Now all that’s left is to install dark rustic wood floors and change out a few appliances.

Thanks for stopping by! I hope I’ve inspired you to tackle your own kitchen makeover.

- Mrs. E.


Tuesday, November 29, 2011

{nifty housewife: removing candle wax from glass}

I love candles because they provide the perfect amount of warm lighting to set just about any mood. For our wedding reception we had over 100 candles lit all over and it made our reception hall (which has a very open and industrial interior design) incredibly warm, intimate, and inviting. The unfortunate side of candles is that if you have them in a deep container, the melted wax builds up and it can be very hard to get out. Even if you slowly chip it out, it still leaves lots of residue.

A while back, my wonderful friend Giselle, shared a trick she learned at work when faced with a similar dilemma. Below is a tutorial I created to take you step by step through this nifty little trick.

Step 1: Remove the lid from your container (if it has one).


Step 2: Place your container in the freezer (move aside waffles!). Allow container to sit in freezer for about 6 to 24 hours (depending on the amount of wax build-up you have).


Step 3: After you’ve let your container sit in the freezer for the appropriate amount of time, remove from the cold and tap wax lightly with a butter knife. The wax should pop right off the glass. If it doesn’t, it needs to sit in the freezer a little longer.


Step 4: Tilt container and let wax fall out onto your counter. Give it a little shake to loosen any remaining pieces.


Step 5: Admire your wax-free container!


I did try this trick with a ceramic candle holder and it worked perfectly. I wonder what else this could also work on.

Have a lovely day!

Mrs. E.


Related Posts Plugin for WordPress, Blogger...